To try and fix the cross dissolve problem, I deleted all of the cross dissolves in my video and then reapplied them. Once I had done this, I exported the video but it still did not work. I then exported individual cross dissolve clips to see if they worked, which they did.
Friday, 30 March 2012
The Wrestler (Not Final Video)
This is the music video that I have created for my A2 coursework, however there is a problem with the cross-dissolves as on Final Cut Pro they appear and run smoothly yet when they have been converted, they appear as black flashes. The problem is being looked into.
To try and fix the cross dissolve problem, I deleted all of the cross dissolves in my video and then reapplied them. Once I had done this, I exported the video but it still did not work. I then exported individual cross dissolve clips to see if they worked, which they did.
To try and fix the cross dissolve problem, I deleted all of the cross dissolves in my video and then reapplied them. Once I had done this, I exported the video but it still did not work. I then exported individual cross dissolve clips to see if they worked, which they did.
Thursday, 29 March 2012


Wednesday, 28 March 2012

Friday, 23 March 2012
Music Poster Review
This is the poster that I have created for the draft. However, it does not conform to typical codes and conventions that are seen on the majority of music posters of this genre. For example, it is too dark which means that it is not eye catching, meaning that people will not notice it and this will result in a decline of sales of the album.

Monday, 19 March 2012
Music Video Finished
Today I managed to finished my music video so all I have to do now is fine-tune it and then I will be able to upload it.
Wednesday, 14 March 2012
DigiPak Booklet Review
This is the booklet for the DigiPak that I have created for the second digipak. This is not my final design as it does not follow the typical codes and conventions of the majority of acoustic music booklets. For example, it is very dark which means that it is not very appealing and it takes away the "fun" aspect of the album and creates a feeling that it will be boring and sombre, even when the majority of the songs are lively.


DigiPak Review 2
This is my final DigiPak that I have created using some codes and conventions that are found on other acoustic genre DigiPaks. The CD cover features the name of the artist as well as the name of the album. The back cover features the names of the songs that feature in the album as well as a barcode and disclaimer. The inside cover, where the booklet will go, features a picture of the artist looking thoughtful. The actual CD features a disclaimer around the disk as well as the name of the artist and song as well as the record label.

Monday, 12 March 2012
DigiPak Review
This is the DigiPak that I have started to design.
However, during the construction of the DigiPak, I realised that the front cover was not suitable for this genre of music as it did not match the typical codes and conventions that are associated with an acoustic genre music album. For example, the audience and record label would expect to see a close up of the musician on the front cover as it helps to sell the album and create an image that the public will recognise and can associate with. This cannot be seen with my front cover as even though I like the picture, it does not feature the artist.

On the other hand, I think that the back cover is really nice as it is just a picture of the sea with the names of the songs. This helps to set a theme of sombreness and loneliness, which is felt throughout the majority of the songs in the album. As a result, I am going to keep the back cover as it is, and add the bar code and various other items that are scene on CD covers, but am going to replace the album cover with a picture of the artist.

Monday, 5 March 2012
Sunday, 4 March 2012
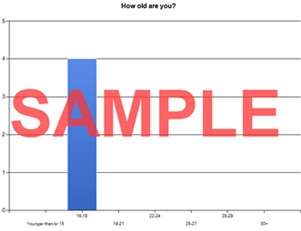
Survey Results
These are the results that I received from the survey that I created to find out what type of genre and style of music video that people like to watch.


Thursday, 1 March 2012
Construction of Music Video
These are some screen shots of the construction and editing phase of my music video.
This is the original footage before I changed it to monochrome.

To do this, I added a video filter and adjusted the brightness and contrast of the filter.

Once I had one this, a red line appeared above the footage that indicated that the footage, with the new filter, had not been rendered.

To render the footage I clicked on "Sequence - Render All - Video".
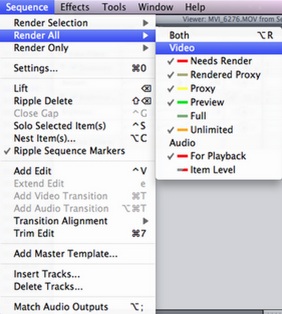
Once I had done this, a box appeared to let me know that the footage was being rendered.

Once it had been rendered, the footage was now in monochrome.

To separate the footage and add in another clip, I first clicked on the footage that I wanted to separate.

Using the razor blade, I clicked on the footage.

This split the clip and I was able to add in another piece of footage.

These are some other screen shots that I took whilst I was editing the music video.


This is a screen shot of some of the footage that I have put together to create the music video.
Subscribe to:
Posts (Atom)